Tuesday, April 26, 2016

Tackling Clutter: Paperwork

Paperwork. Are you scared of this one just from reading the first word? I'm a little scared to write about it because this is even tough for me. I remember days where piles upon piles of paperwork just cluttered up our guest room closet + our empty desk drawers. Whenever tax time came, it was like a mad dash to hunt down everything we needed. I can NOT stand having to hunt for items. I don't want to hunt for clothing, shoes, dishes, toys, and I most certainly do not want to hunt down paperwork. It's so easy to let it pile up. Trust me, as much as I hate to admit it, I've been that person. When I was single, I literally had ONE accordion folder that held all of my important paperwork. Now that I'm married, it's crazy how much paper seems to have multiplied. I blame Trey. :P

The first order of business when dealing with an overwhelming {or even just a "normal"} amount of paperwork is that you have to get it all in ONE place. I highly recommend a large room with lots of space for lots of piles. I know, it's a pain in the butt and it will look completely overwhelming, but just like in previous posts, it's important to have it all in one place so you know what you're working with. Once it's all in one ginormous pile, you can start sorting through and creating smaller piles by category {i.e. insurance policies, social security information, marriage certificates, receipts,  job-related info, etc}. This will be the longest part of this entire process, but I promise it will make your life a million times less complicated in the long run and it won't leave you begging for help.


Again, it's going to be crucial that you toss + shred as you go. DO NOT KEEP PAPERWORK THAT'S OUTDATED OR UNNECESSARY! Anything with personal information on it needs to be shredded for privacy purposes. That reminds me, we need a new shredder. Let me add that to the ongoing list of "things we need". I'm not kidding when I say that we had receipts from like 2010 in our large pile of paperwork. We also had an enormous amount of random pages from our various policies that were not necessary. Get rid of it, y'all. Get rid of it.

I figured the easiest way to break all this down is with the use of some visuals. I'll warn you that they're nothing fancy + some are even stock photos that I found online, but it will show you how we organize all of our paperwork.

The materials used:
a safe, a black storage crate from Target/Walmart, file folders {hanging + non-hanging}, a label maker {ours is Dynamo}, and a sharpie.

We keep the extremely crucial folders in the safe {birth certs, SS, marriage cert., etc} in case of fire or some other extreme situation. I organized ALL of our paperwork into the following categories + there may even be a few I've forgotten to include, forgive me. You will need to adjust this as you see fit for your needs.

* Insurance policies: Within this folder I have the following separated into their own folder: Life, Health, Home, Auto
* Job-related: my teaching license + all "teacher test" scores, Trey's paramedic/FF certs., resumes, etc
* Marriage + Birth Certificates
* Social Security: cards + other pertinent info
* Gun-related: We are proud gun owners, so all of the necessary buyer/seller agreements + concealed weapons permits paperwork are housed in this folder
* Medical: This folder mostly holds records from when Emerson was born, along with some of my information from our doctor's appointments. It could also be for future medical-related paperwork, excluding health insurance {as that belongs with the insurance policies}
* House: Anything pertaining to our house {aside from homeowners insurance} is filed here
* Taxes: Every year's tax returns and all pertaining info {W-2, etc} are filed here. I have separate folders within this one for each tax year.
* Passports/Travel

Here are a few pictures that I snapped of our folders. The insurance folder holds various colored folders, categorized by the type of insurance {auto, health, home, etc}.


Example of a specific colored folder inside the "Insurance" one.


There is ONE large file folder labeled "Taxes" and each tax year is in a separate labeled folder, you know just in case we get audited! *dun dun dun*


There are endless options on how you can organize these items; this is just ONE simple way to do it that was cost effective for us because I already had the file folders from when I taught. I've seen it separated by individuals in the family. I've also seen it color coded {which I would LOVE to do more of eventually}. If you want to color code by the type of items being sorted {medical, certificates, etc}, you could always use different colored file folders instead of all one color, just an idea! :) Our paperwork is currently stored in the safe, as I mentioned + in a crate just like the one seen below.


Finally, have a specific place for bills to rest until they're paid {if they're not all electronic, that is} and have a space for outgoing mail. Don't let it just pile up on your kitchen counter or entryway table. They have mail sorters like this one below {which I actually use a similar one to store our HGTV magazines} that create an easy way to sort mail by family member, or by incoming/outgoing, paid/unpaid, etc. Other options include baskets or a standing file holder like the one seen on our desk in the picture below.


Paperwork sucks! There's no way around that, but keeping it organized makes life SO much easier. You know exactly where to look for specific items and it makes sorting incoming paperwork a heck of a lot easier once it's assembled in an organized fashion.  Whatever your muse, make it work and keep your life organized. XO!

Friday, April 22, 2016

DIY Distressed Desk


Occasionally I'll get the urge to repaint. Often it's an entire room, which is actually a large task, but this time it was just a desk. The desk in our office nook was a hand-me-down from my parents. It used to have a large hutch on top, but I removed it because it was much too large + it was just unused space. It used to be a dark walnut brown, but I painted it black a year or two ago to better match the decor in the room in which it's located {which you can see below}.


I never disliked the black desk, it was just that here recently I've had the inkling to lighten up this room. I've mentioned before about how it doesn't get very good light, so anything I can do to lighten the space is always a plus. Within the past 6 months, I painted our main hallway + an ottoman the color Dove White by Benjamin Moore. It's a slightly off-white color. I had about a quarter {or less} of a gallon of paint leftover and yesterday sealed it's fate. It was a beautiful day, my hubby was home most of the afternoon, so I had a chance to get this desk painted. I decided to distress it slightly too. So, without further ado, here's my HOW-TO on painting + distressing a desk {or table}. Each step has a picture with the description below it.

F I R S T,
The materials used for this project were pretty cost effective.I was able to complete this project for around $6 because I already had most of the materials seen in the picture with the exception of the spray paint + the paint brush. My husband always has latex gloves on hand because of his profession + he even "borrowed" a couple of face masks that we keep at home for instances such as this, or for sickness. Ha.

Materials: Satin spray paint in the color Heirloom White, a paintbrush {I would use a 1-2 inch angled brush instead of a 3 inch like is shown here}, latex gloves, a mask {optional}, a foam roller, sand paper {I believe is was 150 grit}, and about a quart of paint. 

S E C O N D ,

Prepare your work space by laying out a drop cloth {this plastic one is sold at Lowe's for llike $1.50 or so}. Make sure you are working in a well ventilated area. I did this in the garage with the door open. Let me preface this entire next part by saying that in order to do a distressed look, your piece of furniture MUST have a dark color as the base. So, if you're going dark to light it should work just fine, but if you going light to a different light color, you will need to add a dark color first before adding another light color on top. I hope that makes sense.


Run that sand paper over your desk to rough it up a bit. This isn't absolutely necessary, but I had some already peeling paint + rough spots on the tabletop, so I wanted to smooth it out before painting. There's really no rhyme or reason to sanding, at least not in my opinion, so just go for it.

T H I R D,

 I began the painting process by spray painting the desk. I did this primarily for coverage purposes. Because the desk was black + I didn't have a whole lot of actual paint, I decided to spray paint a couple layers first to ensure that I would have enough paint do the final couple of layers. I spray painted the desk TOP first by doing a swift back and forth motion down the length of the desk. The key to even coverage when using spray paint is to continuously spray without spraying one spot too long {it builds up if you do that}. Do light, even coats. Don't overload it on the first spray. The first time I sprayed this desk top I could still see most of the black because I just did a light coat. I did 3-4 coats of spray paint over the entire desk. I did the legs vertically {sprayed up + down, not side-to-side} to optimize the amount of spray paint used. The picture below shows the desk after I was finished spray painting. Now, remember I still had to paint with actual paint, so it's fine that it wasn't fully covered. I just wanted to get MOST of the black covered.


F O U R T H,
 Use the foam roller to paint the entire desk {yes, even the legs and sides}. I went in the corners and crevices with the paintbrush at the end. I prefer a foam roller to a paint brush because I don't like the lines a paintbrush leaves behind. You could totally use a brush for the entire project if you wanted though. I followed the same idea with the roller as I did with the spray paint {back + forth along the top + sides of the desk + up and down for the legs}. I put 3 coats of paint ON TOP of the already spray painted desk. I let each coat dry for about 45 minutes in between coats. This was the final coat drying.

F I F T H,
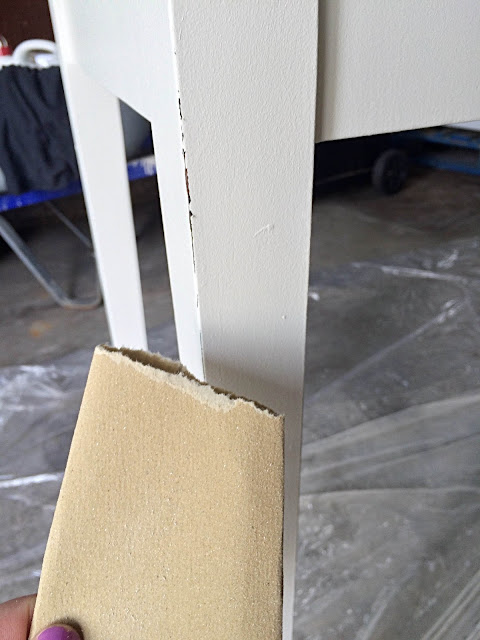
To add a distressed look to your desk, use sandpaper to rough up the edges and corners of the desk. I didn't do a TON of distressing, but just enough to make it look older + not just freshly painted. Literally, just push + pull the sandpaper removing small buts of paint in the process. Be careful not to remove TOO much, as this will make it look intentional, rather than unintentionally + natural. You can see more of the distressing in the pictures below in the SIXTH step.


S I X T H,

Allow your desk or table to dry for a good while {I waited about 4 hours, but technically you should probably allow more time than that}. I brought it back inside + waited until this morning to restyle it, allowing it extra time to dry. Don't put anything on it until it's dried for more than 12-24 hours, or else it will stick to your belongings because the paint is still somewhat tacky. 


In the end, you're left with a little something like this. :) Now, go paint + distress my friends! XO!


Tuesday, April 19, 2016

Tackling Clutter: Office Spaces

Hey friends! I'm about 2 days late to this game, and for that you can blame the gorgeous summer-like weather that has finally decided to stick around these parts. Oh, and my crazy tantrum-throwing toddler. I have been living outside because it keeps her so content. I decided to bring my "work" outside with me yesterday, and so here we are...finally.

Office space. It can be a table, often the kitchen table, or a whole separate room with a desk and shelves and the whole nine. If you're like me, then you have a little office space tucked away in a corner of the guest room. Because neither my husband nor I really "work from home", we don't need some elaborate office space. This little set-up works just fine for our needs at the moment. {Also, let me apologize in advance for some of these pictures. This room gets HORRIBLE light + I'm not good at photography to begin with, so yeah...hang with me.}


Today, I don't have an elaborate post for you like I did with the kitchen or pantry, because our office space isn't THAT big. Today, I thought it'd be helpful to outline how we organize office supplies, paperwork, and the like. Plus, I have a couple of easy DIY projects for you guys.

DIY Sterilite Drawer Upgrade

The desk we use was a hand me down that I painted black. I'm actually about to paint it white soon to hopefully lighten this space. The room that houses this little office nook doesn't get much light, as I mentioned, so I think that lighter furniture will help a little. Anyway, the desk has one little flip down drawer that's meant for a keyboard. Inside of that holds computer paper and cards for various holidays {Target dollar spot had a wide variety of blank cards a while back and I stocked up so I never miss a beat}. Aside from that one drawer, we have zero storage for office-related items. Enter one of my favorite little DIY hacks. I had about a million five plastic 3-drawer Sterilite containers from when I taught. They have fairly deep drawers and are great for storage. However, they are unsightly and NOT cute when used for home decor. I was at Target a couple of months ago {haha that was like thousands of Target trips ago}, when I stumbled upon some $1 file folders in gold, black and white prints in the dollar section. I wasn't quite sure how I'd use them, but I knew they were too good to pass up, so I bought a pack of 3. When I got home, I realized that they matched the decor in our guest room pretty well and immediately the idea came to me. I would use them in the front of each drawer to hide what was inside/make the drawers look high-end. HAHA, okay that's stretching it. They don't look high-end by any means, but they DO look way cuter than before. All I did was cut the file folders in half + trim in to size, then I just slid it right in down in the drawer where you would open it. This is how it turned out and I LOVE it.

turned into


Before

After

The drawers are organized as follows:

 Top: Computer paper
{You can see here how I slid the file folders in right at the front of the drawer. 
Also, this was before I cut them to size-I was testing it to make sure it fit.}

Middle: Office supplies, pens, highlighters, push pins, multi-tool, stamps, etc.


Bottom: Notepads+ folders


On the desk itself, I keep very few items, to maximize the small surface. To the left of the computer is a vase {thrifted} that holds all of our Sharpie markers. Behind the computer is the printer, which stays folded up most of the time. To the right of the computer is a a Target dollar spot file folder organizer, which I actually use to hold my calendars {for my blog/IG, and another for meal planning}. Next to that is the lamp, one faux flowered plant in a glass dollar store vase, and a frame with a free printable. That's it. KISS-Keep It Simple Stupid Silly. My history teacher in high school taught us that acronym, except he used stupid. I don't like calling y'all stupid, so I changed it to better accommodate my feelings.


That's pretty much it for how I organize our office space. Oh, I do have a Target dollar spot wire basket on the floor that we use as a trashcan.


And if you're wondering about that huge print of Emerson above the desk, well let me tell you about it REAL quick. When I was pregnant I walked our neighborhood almost daily. One day, Trey and I passed that frame {which was originally this weird green/yellow color} on the side of the road. It is HUGE and I knew I could utilize it for a DIY project. I made Trey carry it home for the remainder of our walk. HAHA. Anyway, I spray painted it white and added a $3 Office Max B+W engineer print {see this post on how to get your own}. So for $3, I got a beautiful piece of art for this space.


I know this post wasn't as detailed or as broken down as the others in this series have been, but hopefully you found it helpful nonetheless. Come back next week as I take on a wildcard {as in, I haven't decided which space I want to "tackle" yet- haha!}. XO!


Saturday, April 16, 2016

Styled Shelves: DIY

I'm telling y'all, I'm convinced that beautiful weather gets me motivated to cross off some things on the to-do decorating list. I have been wanting to restyle the shelves {really more like picture ledges} in our dining room for some time, but haven't been inspired to do so. I used to be SUCH an impulse decorator, and as a result would grow weary of the decor I chose after just a short while. It would cause me to want to change it again and again. I have finally learned "my style", and the style that I want for this home/our future home. I am trying to incorporate decor that will carry over into a new home one day. Back to the shelves, I got the itch yesterday to rearrange them. They were only styled with black and white frames prior to my redecorating. They weren't horrid, but they were absolutely nothing to write home about, if you know what I mean. It all started with the sign you see below.

Before
After

DIY #1: Wooden "gather" sign

I knew I wanted to go for a more natural, farmhouse vibe. It's all the rage now, you guys! HAHA Anyway, I started by removing all of the frames so that I had a blank canvas. I knew I needed something rather large for the center of the shelves, so this first DIY was perfect. I had this wooden {almost pallet-like} sign that you see above  that was just sitting unused in the garage {it's painted already in the picture, sorry!}. I spray painted it white + then literally sawed it in half, to make 2 signs. It was perfect and exactly what I wanted. I love the word "gather" in an eating/living space because that's what people do in those spaces. I grabbed these wooden letters at Michaels for $1.99 each. The entire word was ~$13 after tax. I did NOT paint the letters because I liked the raw wood look against the white sign. All I did to attach them to the wood sign was dab some hot glue on the back of each letter and press it down for 5-10 seconds while it got good + attached. It worked beautifully. So, to make this yourself {if you don't have a wooden sign hanging around like I did}, all you'll need is a couple pieces of wood or a pieces from a pallet board would work. Secure them together using either wood glue or nails. For the next part, you can either spray paint it your desired color or you can leave it raw wood. Then determine a word or phrase you want to apply, and either buy the letters like I did, or stencil them on if you prefer the stenciled look. Glue them down and VOILA! This project can be done for under $15-30 depending on materials needed. If you're looking for pallet boards, check Craigslist; people get rid of those things all the time. Also, check with local stores that use them for loading. We've gotten several from stores that don't want them/have tons of them around back.  The great thing about this DIY is that you can make a sign like this for any room in the house!
DIY # 2: "Bloom" standing word

This one is so easy, it almost hurts. It was an impulse buy, that took just an ounce of imagination. This little "Bloom" sign {for lack of a better description} is actually made of foam. It was hot pink and covered in sparkles when I bought it. I don't have a before picture of it, I'm sorry. It was hanging in the party/craft supplies section at Walmart. GET THIS...it was only $0.10. Like, you could buy 10 of these for $1-haha! All I did was spray paint it white and now it rests on the top shelf beautifully. It is thick enough to stand alone, but lightweight enough that even if it falls, no harm done because it's FOAM. I love that it brings a touch of spring to these shelves and practically for free.  


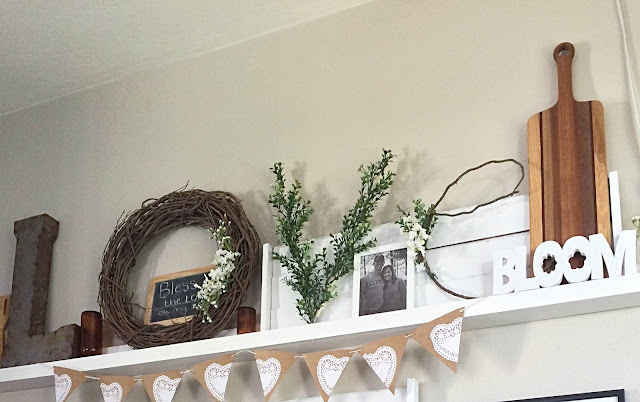
DIY # 3: L.O.V.E

So, when I started adding more to the shelves, I decided to add this awesome rusted metal L, this grapevine wreath, and the mini chalkboard. {All 3 are from Goodwill for under $3 each, btw.} 


Without any forethought, I placed the L + the circular wreath side-by-side, like in the top left picture up above. I stepped back and realized that it almost looked as if I were trying to spell out the word LOVE using unconventional items. AhA! That's when my creative genius wheel started spinning. I knew I was going to have to come up with a V and an E. I had already been to Michaels that day and it's a 30+ minute drive, so going back was out of the question. My friend, Bree {who blogs over at The Homemaking Momma} is literally the queen of beautifully styled shelves, so I texted her and asked for suggestions. Of course, she came through for me.


She was so helpful and suggested covering a letter in greenery somehow. So, I bought a dowel rod for $0.57 at Walmart and used a faux boxwood plant that I already owned {one of my favorites too} and got to work. The plant came apart in little sections {I just pulled it section by section from the foam that was holding it in place in the little planter} and I just hot glued them one at a time {slightly overlapping each} on the V that I created using the dowel rod. It was a very in depth process; I cut  broke the dowel rod in half, then duck tapped it together at the bottom, so it formed a 'V', and then I glued the pieces of boxwood to the dowel rod. It took me about 5-10 minutes total and cost me $0.57 cents. This letter is my favorite of the four!

The 'e' was a little more complicated. I pondered for a while, until I realized I could make an 'e' for free using sticks from our back yard {we have TONS of pines that like to shed their branches + pinecones daily}. I played around with them and I originally made a capital E, but it ended up falling apart, plus it was a little small compared to the other letters. I went back outside for more sticks, and this time I decided to do a lower case 'e' and to make it larger. If you can picture this, I was literally bent over outside hunting for sticks that had a curve like in a lower case 'e'. I found a couple actually, and after playing around for a few minutes I was able to make an 'e' using the sticks that I found. I used floral wire to piece them together and then I added some faux greenery/small white flowers {from Michaels on sale for $1.49} to cover most of the wire. I can't really explain how I created the 'e' specifically; all I can say is if you try it, just play around with it until it resembles the letter you want. 


I am in LOVE with how these shelves turned out. I was expecting to have to spend money that I didn't have in order to achieve a look that I wanted, but in the end, I didn't have to spend much at all. What's fabulous is that they are a true reflection of me and my style. 99% of the items on these shelves were thrifted.  Um, hello! Have you met me? The only parts that aren't thrifted are the banner, which is a Target dollar spot $1 purchase, the white frames {Target a while back}, the taller clear glass bottles and the faux flowers/greenery {Michaels}.  I try not to brag, but I'm just gonna' say it, I think these looks dang good considering the amount of money I spent on them. Just another reason to add to the already VERY long list of reasons why I LOVE thrift store shopping. Remember, the key is to be open-minded and don't see things at face-value; think outside the box!


I hope you love them as much as I do! Thanks for reading! Come back tomorrow for another post in the series "Tackling Clutter". I'll be tackling my office space, and it includes a couple of very simple DIY's too! You won't want to miss it. XO!